This post is all about how you can parameterize your builds to work in different scenarios. Before you read this, please take a moment to read Mikaels introductory blog post and take a look at my webcast on Channel9 [~18m], if you haven’t already – it will eaze your understanding of this article.
To put this post in to context, let’s assume we have a multi target environment, with multiple servers in the production environment.
So for this sample we have two environments; Test and Production. The Test environment has one server (TEST1) whereas the Production has two (PROD1 & PROD2).
Scenario 1 – Deploying to Test for the first time
As the developers are done and have checked in their code and binding files, they are ready to create a Build Type. They do this through the Team Explorer add-in, after which they’ll make a small modification to the build script (as described in the Mikaels introductory post). After this – all they have to do is to “Queue New Build” and choose the Build Agent running on the TEST1 machine. No parameters required.
The solution will then be Compiled, Added to GAC and Deployed to BizTalk. The last step would be to Import the bindings files to create the ports etc.
Scenario 2 – Deploying to Test for the second time
If the structure of the solution has not changed since the last build, – the developer would just Build the solution as described in Scenario 1, where it is first being Undeployed and Removed from the GAC before it’s being redeployed.
However, if the structure of the solution has changed, there might be an issue. For example, let’s say the developer originally had two projects, one “orchestration project” and a “schema project” (referenced by the first one), and then decided to do some refactoring to consolidate the two projects into one. Deploying this updated solution will cause an conflict since the “schema assembly” is no longer part of the bindings file, and will therefore not be removed.
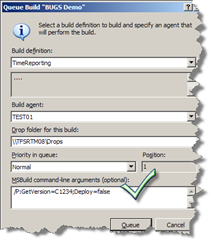
This can be resolved by undeploying the previous label or changeset using the following parameters:
/P:GetVersion=C1234;Deploy=false (using changeset)
/P:GetVersion=LTimeReporting_20090310.1;Deploy=false (using label)
When the solution is undeployed, the developer can building the solution again. This time, without any parameters. Just like we did in scenario 1.
Scenario 3 – Deploying to Production
Same configuration described in Scenario 1 and 2 applies to building to the Production environment. Although there is no need to create additional Build Types, you would however need to select a different Build Agent – the one running on the PROD1 machine instead of the one on TEST1.
However, the scenario is a bit different since you also need to add the assemblies to the GAC on the PROD2 machine. To accomplish this you could just run the build agent on both machines and thus run the full build/undeploy/deploy sequence on both machines. That’s however a undesirable scenario. Originally we did this using another form or parameterization where we would use a gac_only flag on PROD2. However Mikael recently made an update to use PsExec after at tip from Kent Weare about how to use PsExec to remotely copy and install assemblies to the GAC. This enables you to run the build only on one machine. All that is needed is to make some modifications to the Build script (TFSBuild.proj). Alternatively, if all solutions are deployed to the same environments, you could do this change to the Blogical.BizTalk.CustomTasks.targets file located in the TeamBuildTypes folder (again; see webcast or read Mikaels introductory blog post).
Download version 1.1 of the Blogical.Shared.Tools.BizTalkBuildTasks (latest at the time of writing).
Installation
The Zip file includes the Custom Tasks library and the CustomTask.target file.
- Save the Blogical.Shared.Tools.BizTalkBuildTasks.dll file to preferred directory on each server running the Build Agent. You can use a network share.
- Edit the Blogical.BizTalk.CustomTasks.targets file (line 40). Set the <Blogical_CustomTasks> to the directory where you saved the Blogical.Shared.Tools.BizTalkBuildTasks.dll.
- Check in the Blogical.BizTalk.CustomTasks.targets file to the TeamBuildTypes folder in you TFS project.
- Download and install PsExec. You need to complete this step on each of the servers running the build agent.
- Edit the Blogical.BizTalk.CustomTasks.targets file (line 43). Set the <PsExecPath> to the path where you installed PsExec.


